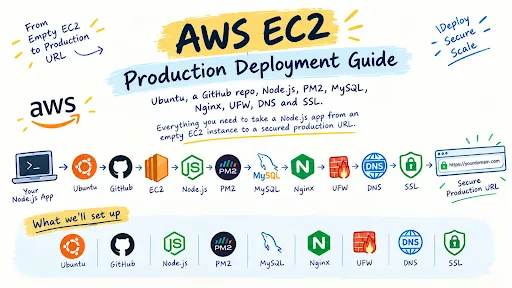
AWS EC2 Production Deployment Guide
Ubuntu, a GitHub repo, Node.js, PM2, MySQL, Nginx, UFW, DNS and SSL. Everything you need to take a Node.js app from an empty EC2 instance to a secured production URL.
What you'll use
Quick check
How to Launch an AWS EC2 Instance
Update the server
Run this from your EC2 SSH terminal:
sudo apt update && sudo apt upgrade -yIf Ubuntu asks you to reboot, do it and reconnect afterwards:
sudo rebootInstall common packages
sudo apt install -y curl wget git unzip software-properties-common ufw ca-certificatesCheck Git:
git --versionInstall Node.js LTS
curl -fsSL https://deb.nodesource.com/setup_lts.x | sudo -E bash -
sudo apt install -y nodejs
Check:
node -v
npm -vInstall PM2
sudo npm install -g pm2
pm2 -v
Restart on reboot
To bring your app back automatically after an EC2 reboot, run pm2 startup. PM2 prints a command. Copy and run that exact command.
pm2 startupOnce your app is running (step 14), save the process list:
pm2 savepm2 startup and only use pm2 save. For a production server, enabling it is recommended.Get your code onto the server
Pick how your repository is hosted. Private is the default.
1. Create a classic Personal Access Token
- On GitHub open
Settings → Developer settings → Personal access tokens → Tokens (classic). - Click
Generate new token (classic)and name it, for exampleEC2 Production Server. - Choose an expiration and tick the
reposcope. It grants private repository access. - Generate the token and copy it immediately. It looks like
ghp_xxxxxxxxxxxxxxxxand is shown only once.
2. Authenticate on EC2
sudo apt install -y gh
gh auth login
Answer the prompts like this:
? What account do you want to log into?            > GitHub.com
? Preferred protocol for Git operations?          > HTTPS
? Authenticate Git with your GitHub credentials?  > Yes
? How would you like to authenticate GitHub CLI?  > Paste an authentication token
Paste the token, then verify:
gh auth statusgit config --global credential.helper store. The GitHub CLI handles credentials for every later git pull.3. Clone the repository
cd ~
git clone https://github.com/YOUR_USERNAME/YOUR_REPOSITORY.git
cd YOUR_REPOSITORY
git statusYour project now lives at /home/ubuntu/YOUR_REPOSITORY.
Install dependencies
If the project has a package-lock.json, use a clean install:
npm ciOtherwise:
npm installConfigure environment variables
nano .envNODE_ENV=production
PORT=3000
DB_HOST=127.0.0.1
DB_PORT=3306
DB_NAME=app_db
DB_USER=app_user
DB_PASSWORD=YOUR_STRONG_DATABASE_PASSWORDAdd the rest of your application's variables. In nano, save with Ctrl + O, Enter, then exit with Ctrl + X. Then lock the file down:
chmod 600 .env.env is listed in .gitignore.Install and secure MySQL
sudo apt install -y mysql-server
sudo systemctl status mysql
sudo systemctl enable mysql
Then run the hardening script and follow the prompts:
sudo mysql_secure_installationCreate the database and user
Open MySQL with sudo mysql, then run:
CREATE DATABASE app_db;

CREATE USER 'app_user'@'localhost'
IDENTIFIED BY 'YOUR_STRONG_DATABASE_PASSWORD';

GRANT ALL PRIVILEGES ON app_db.* TO 'app_user'@'localhost';
FLUSH PRIVILEGES;
EXIT;localhost. To pick a character set explicitly, use CREATE DATABASE app_db CHARACTER SET utf8mb4 COLLATE utf8mb4_unicode_ci;. It isn't required for a basic deployment.Test the new user:
mysql -u app_user -p app_dbSHOW TABLES;
EXIT;Remote MySQL access (optional)
When Node.js and MySQL run on the same EC2 server you don't need to change anything. Keep bind-address = 127.0.0.1 and use DB_HOST=127.0.0.1. Skip this step for a normal web application.
Only if you must connect from, say, MySQL Workbench on your laptop:
sudo nano /etc/mysql/mysql.conf.d/mysqld.cnfChange the bind address, save, and restart MySQL:
bind-address = 0.0.0.0sudo systemctl restart mysqlThen allow port 3306 from your own IP only:
sudo ufw allow from YOUR_PUBLIC_IP to any port 3306 proto tcpBuild the app (if required)
This depends on your project. TypeScript, Next.js and anything else with a build step:
npm ci
npm run build
A plain JavaScript backend (server.js, app.js, index.js) with no build script can skip npm run build. Install dependencies and start it.
Install Nginx
sudo apt install -y nginx
sudo systemctl enable nginx
sudo systemctl start nginx
sudo systemctl status nginxConfigure Nginx
Create the site config:
sudo nano /etc/nginx/sites-available/appserver {
listen 80;
listen [::]:80;
server_name yourdomain.com www.yourdomain.com;
location / {
proxy_pass http://127.0.0.1:3000;
proxy_http_version 1.1;
proxy_set_header Host $host;
proxy_set_header X-Real-IP $remote_addr;
proxy_set_header X-Forwarded-For $proxy_add_x_forwarded_for;
proxy_set_header X-Forwarded-Proto $scheme;
proxy_set_header Upgrade $http_upgrade;
proxy_set_header Connection "upgrade";
proxy_cache_bypass $http_upgrade;
}
}server_name api.yourdomain.com; instead.Enable it, drop the default site, test and restart:
sudo ln -s /etc/nginx/sites-available/app /etc/nginx/sites-enabled/app
sudo rm -f /etc/nginx/sites-enabled/default
sudo nginx -t
sudo systemctl restart nginx
nginx -t should report syntax is ok and test is successful.
Start the app with PM2
Use the start command that matches how your project runs. Check your package.json if unsure.
A plain JavaScript backend with no build step:
cd ~/YOUR_REPOSITORY
npm ci
pm2 start server.js --name app
pm2 savepackage.json actually uses.Test it locally
Before touching DNS or SSL, confirm the app answers on its own port:
curl http://127.0.0.1:3000
pm2 logs app
pm2 list
Cluster mode (optional)
-i max starts one worker per CPU core. On a 2-vCPU machine you will see two workers in pm2 list.
# using server.js
pm2 start server.js --name app -i max

# using npm start
pm2 start npm --name app -i max -- startConfigure DNS
This happens at your DNS provider, not in the SSH terminal. For a normal website, create two A records:
Type: A    Name: @      Value: YOUR_EC2_PUBLIC_IP    TTL: 300
Type: A    Name: www    Value: YOUR_EC2_PUBLIC_IP    TTL: 300
For a backend API on api.yourdomain.com:
Type: A Name: api Value: YOUR_EC2_PUBLIC_IP TTL: 300Then confirm it resolves to your EC2 public IP:
nslookup yourdomain.com
nslookup api.yourdomain.com
dig api.yourdomain.comConfigure UFW
Allow SSH first, so you don't lock yourself out, then web traffic:
sudo ufw allow OpenSSH
sudo ufw allow 80/tcp
sudo ufw allow 443/tcp

# or, for both web ports at once:
sudo ufw allow 'Nginx Full'
Review, enable, and check again:
sudo ufw status
sudo ufw enable
sudo ufw status verbose
You should see 22, 80 and 443 allowed. Don't add 3306 for the normal setup.
Test over HTTP
Open http://yourdomain.com (or http://api.yourdomain.com). The request travels like this:
Browser → AWS Security Group :80 → UFW :80 → Nginx → 127.0.0.1:3000 → PM2 → ApplicationAdd SSL with Certbot
sudo apt install -y certbot python3-certbot-nginxRequest a certificate for the domains you configured:
sudo certbot --nginx -d yourdomain.com -d www.yourdomain.comIf Certbot asks whether to redirect HTTP to HTTPS, select the redirect option.
At this point Certbot modifies /etc/nginx/sites-available/app and adds the SSL configuration.
Check the configuration Certbot generated
Now you can inspect it:
sudo nano /etc/nginx/sites-available/appYou may see something approximately like this (shown for an API on api.yourdomain.com):
server {
    server_name api.yourdomain.com;

    location / {
        proxy_pass http://127.0.0.1:3000;

        proxy_http_version 1.1;

        proxy_set_header Host $host;
        proxy_set_header X-Real-IP $remote_addr;
        proxy_set_header X-Forwarded-For $proxy_add_x_forwarded_for;
        proxy_set_header X-Forwarded-Proto $scheme;

        proxy_set_header Upgrade $http_upgrade;
        proxy_set_header Connection "upgrade";

        proxy_cache_bypass $http_upgrade;
    }

    listen 443 ssl;
    listen [::]:443 ssl;

    ssl_certificate /etc/letsencrypt/live/api.yourdomain.com/fullchain.pem;
    ssl_certificate_key /etc/letsencrypt/live/api.yourdomain.com/privkey.pem;

    include /etc/letsencrypt/options-ssl-nginx.conf;
    ssl_dhparam /etc/letsencrypt/ssl-dhparams.pem;
}

server {
    listen 80;
    listen [::]:80;

    server_name api.yourdomain.com;

    return 301 https://$host$request_uri;
}Save and exit if you opened it:
Ctrl + O
Enter
Ctrl + X
Then re-test Nginx:
sudo nginx -t
sudo systemctl restart nginx
Open https://yourdomain.com (or https://api.yourdomain.com). Finally, confirm automatic renewal works:
sudo systemctl status certbot.timer
sudo certbot renew --dry-runAWS Security Group
In the AWS Console go to EC2 → Instances → your instance → Security → Security groups → Inbound rules.
Type     Port   Source
SSH      22     Your IP
HTTP     80     0.0.0.0/0
HTTPS    443    0.0.0.0/0
If your server uses IPv6, add the matching ::/0 rules too.
Command cheat sheet
The commands you'll reach for after the server is live.
sudo nginx -t                        # test config
sudo systemctl restart nginx         # restart
sudo systemctl reload nginx          # reload without dropping connections
sudo systemctl status nginx          # status
sudo tail -f /var/log/nginx/error.log
sudo tail -f /var/log/nginx/access.logFinal architecture
For a backend API, this is what you've built:
                  INTERNET
                      │
                      ▼
            api.yourdomain.com
                      │
                      ▼
               EC2 Public IP
                      │
                      ▼
     AWS Security Group  (22 / 80 / 443)
                      │
                      ▼
                    UFW
                      │
                      ▼
            Nginx :80 / :443
                      │
                      ▼
              127.0.0.1:3000
                      │
                      ▼
                     PM2
                      │
                      ▼
                   Node.js
                      │
                      ▼
              127.0.0.1:3306
                      │
                      ▼
                    MySQL
Setup checklist
- Update Ubuntu and install common packages.
- Install Node.js LTS and PM2.
- Authenticate with GitHub (private repos) and clone the repository.
- Run
npm ciand configure.env. - Install MySQL, then create the database and app user.
- Build the app if it has a build step.
- Install and configure Nginx.
- Start the app with PM2, test on
127.0.0.1:3000, and runpm2 save. - Point DNS at the EC2 public IP and check it resolves.
- Open ports 22, 80 and 443 in the Security Group and UFW.
- Test over HTTP, then add SSL with Certbot and test renewal.
Related blog
How to Upload Images to Amazon S3 and Serve Them with CloudFront Signed URLs in Node.js