How to Upload Images to Amazon S3 and Serve Them with CloudFront Signed URLs in Node.js
A step-by-step guide to uploading, deleting and securely delivering images with Amazon S3, CloudFront signed URLs, Multer and Sharp in a Node.js and Express backend.
What you'll use
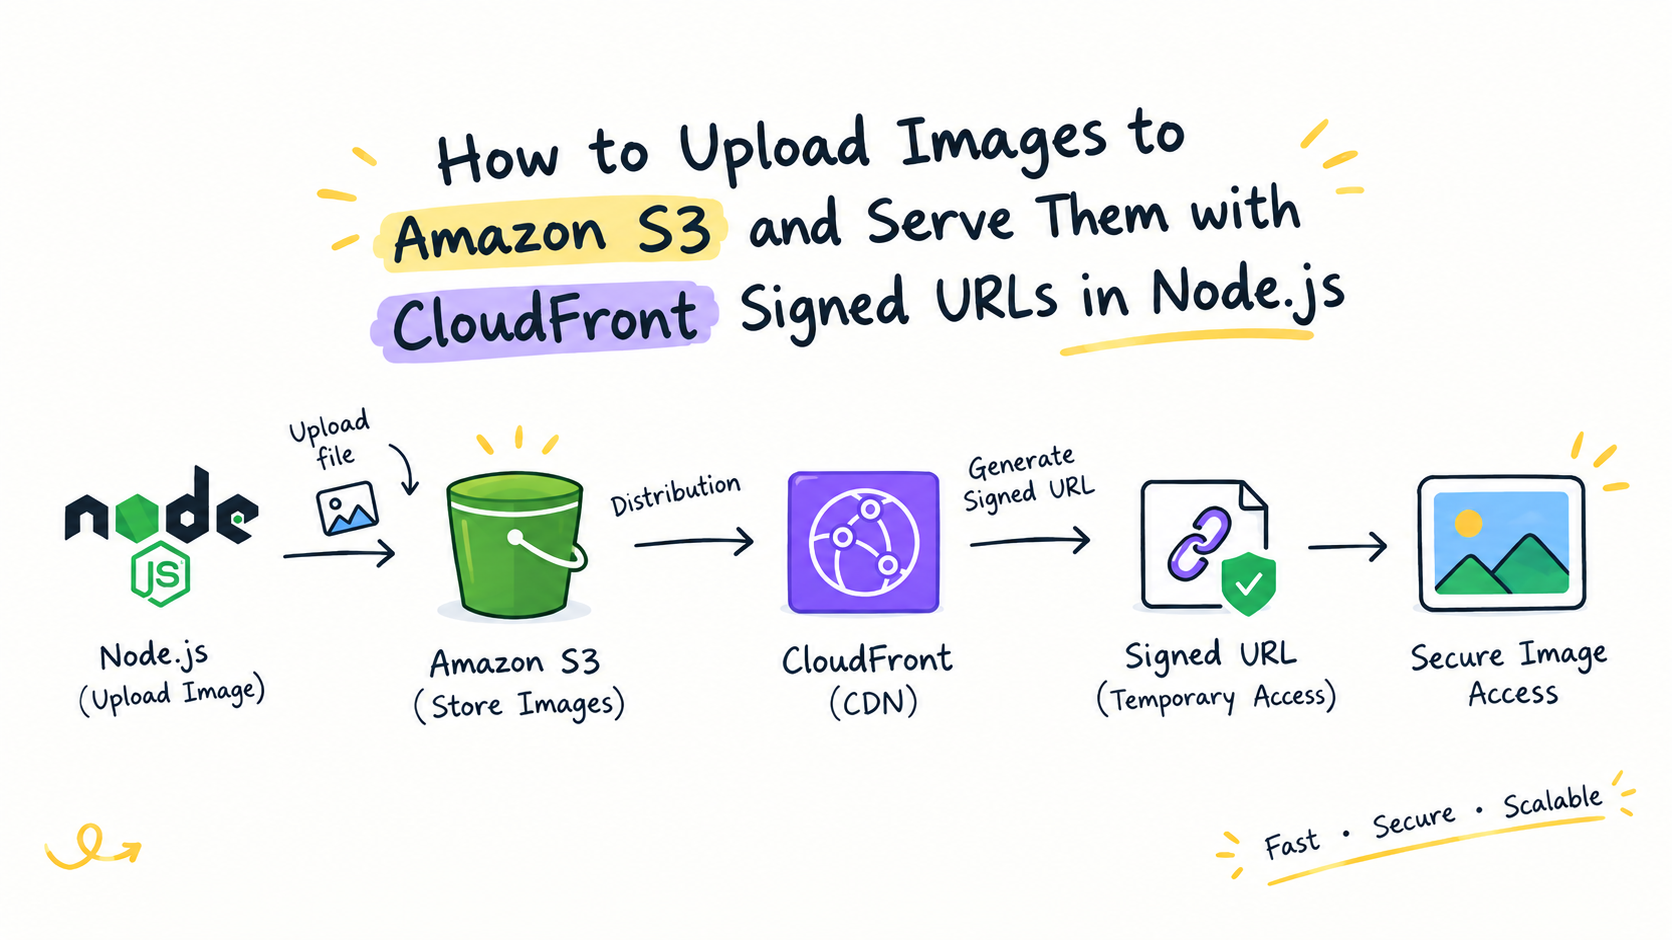
What we're building
In this guide you will store images in a private Amazon S3 bucket and deliver them through the CloudFront CDN. The bucket is never exposed publicly. Users receive short-lived signed URLs instead.
PutObjectuploads an image to S3.DeleteObjectremoves an image from S3.- CloudFront serves images from edge locations close to the user, which improves delivery speed.
- Signed URLs grant temporary access and let you control how long each link stays valid.
  Upload                         Delivery
  ──────                         ────────
  Client → Express API           Client → CloudFront (signed URL)
            │                                │
            ▼                                ▼
   multer → sharp (WebP)           Edge cache (HIT / MISS)
            │                                │
            ▼                                ▼
S3 PutObject ───────────────► Private S3 bucket (via OAC)Prerequisites and packages
You need an AWS account, Node.js 18+, and an Express project. Install the dependencies:
npm install @aws-sdk/client-s3 @aws-sdk/cloudfront-signer multer sharpBy the end you will have these environment variables. The next steps show where each value comes from:
AWS_REGION="ap-south-2"
AWS_BUCKET_NAME="my-project-images"
AWS_ACCESS_KEY_ID="AKIAXXXXXXXXXXXX"
AWS_SECRET_ACCESS_KEY="xxxxxxxxxxxxxxxxxxxxxxxx"
CLOUDFRONT_DOMAIN="https://xxxxxxxx.cloudfront.net"
AWS_CLOUDFRONT_KEY_PAIR_ID="E123456789ABCDE"
CLOUDFRONT_PRIVATE_KEY_PATH="./keys/private_key.pem"Choose a region and create the S3 bucket
Pick the AWS region closest to your users or servers. For example, Asia Pacific (Hyderabad) is ap-south-2, which becomes AWS_REGION.
Open AWS Console → S3 → General purpose buckets → Create bucket, then:
- Enter a globally unique bucket name, for example
my-project-images. - Keep Block all public access enabled. CloudFront will read the bucket, not the public.
- Click
Create bucket.
The bucket name becomes AWS_BUCKET_NAME.
Create IAM credentials
Your backend needs AWS credentials to upload and delete objects. Choose the option that matches your setup.
A dedicated user limits the damage if a key ever leaks. Go to IAM → Users → Create user and name it, for example, my-project-s3-user.
Attach an inline policy that grants only what the app needs, scoped to your bucket:
{
  "Version": "2012-10-17",
  "Statement": [
    {
      "Effect": "Allow",
      "Action": ["s3:PutObject", "s3:DeleteObject"],
      "Resource": "arn:aws:s3:::my-project-images/*"
    }
  ]
}s3:GetObject only if your backend must read objects directly from S3. CloudFront reads through its own access rule.Create the access key
Open IAM → Users → your user → Security credentials → Create access key. AWS shows the Access key ID and Secret access key. Add both to .env.
Create the CloudFront distribution
Go to CloudFront → Distributions → Create distribution and configure:
- Choose a plan, for example Pay as you go.
- Give it a name such as
project-images-cdn. - Set the origin type to Amazon S3 and click Browse S3 to select your bucket.
- Enable Allow private S3 bucket access to CloudFront (Recommended). This uses Origin Access Control (OAC).
- Keep the remaining defaults and create the distribution.
Copy the Distribution domain name, for example https://xxxxxxxx.cloudfront.net. It becomes CLOUDFRONT_DOMAIN.
Generate the public and private keys
Signed URLs use an RSA key pair. Your backend signs URLs with the private key and CloudFront verifies them with the public key. In Git Bash or any terminal:
mkdir keys

# Generate the private key
openssl genrsa -out keys/private_key.pem 2048

# Derive the public key from it
openssl rsa -pubout -in keys/private_key.pem -out keys/public_key.pem
Keep private_key.pem on your server only. You will upload public_key.pem to AWS in the next step.
# .gitignore
keys/
*.pemAdd the public key and create a key group
Upload the public key
Go to CloudFront → Public keys → Create public key. Name it my-project-cloudfront-key, paste the contents of public_key.pem, and create it. CloudFront returns a Public key ID, for example E123456789ABCDE. This is your AWS_CLOUDFRONT_KEY_PAIR_ID.
Create the key group
Go to CloudFront → Key groups → Create key group, name it my-project-key-group, and add the public key.
Private key  →  Backend (signs URLs)
Public key   →  CloudFront (verifies URLs)
Key group → Distribution behavior (who may sign)Require signed URLs on the distribution
Creating a key group does nothing until the distribution requires it.
- Open your distribution and go to the Behaviors tab.
- Select the default behavior and click
Edit. - Under Restrict viewer access, choose Yes.
- Set trusted authorization type to Trusted key groups and select
my-project-key-group. - Save changes and wait for the distribution to finish deploying.
The S3 utility module
Create utils/s3_bucket/index.js. It handles unique file names, uploads, deletes and signed URL generation.
const {
  S3Client,
  PutObjectCommand,
  DeleteObjectCommand,
} = require("@aws-sdk/client-s3");
const { getSignedUrl } = require("@aws-sdk/cloudfront-signer");
const fs = require("fs");
const path = require("path");
const crypto = require("crypto");

const {
  AWS_REGION,
  AWS_BUCKET_NAME,
  AWS_ACCESS_KEY_ID,
  AWS_SECRET_ACCESS_KEY,
  AWS_CLOUDFRONT_KEY_PAIR_ID,
  CLOUDFRONT_DOMAIN,
  CLOUDFRONT_PRIVATE_KEY_PATH,
} = process.env;

const s3 = new S3Client({
  region: AWS_REGION,
  credentials: {
    accessKeyId: AWS_ACCESS_KEY_ID,
    secretAccessKey: AWS_SECRET_ACCESS_KEY,
  },
});

// Read the private key once at startup, not on every request
const privateKey = fs.readFileSync(
  path.resolve(CLOUDFRONT_PRIVATE_KEY_PATH),
  "utf8"
);

const generateUniqueFileName = (userId, originalFileName) => {
  const extension = path.extname(originalFileName || "").toLowerCase();
  const now = Date.now();
  const hash = crypto
    .createHash("sha256")
    .update(`${userId}-${now}-${crypto.randomUUID()}`)
    .digest("hex")
    .substring(0, 16);

  return `${userId}_${now}_${hash}${extension}`;
};

const uploadToS3 = async (file, folder, fileName, mimetype = "image/webp") => {
  const key = `${folder}/${fileName}`;

  await s3.send(
    new PutObjectCommand({
      Bucket: AWS_BUCKET_NAME,
      Key: key,
      Body: file,
      ContentType: mimetype,
      ContentDisposition: "inline",
      CacheControl: "public, max-age=31536000, immutable",
    })
  );

  return key; // store this key in the database
};

const deleteFile = async (fileKey) =>
  s3.send(
    new DeleteObjectCommand({
      Bucket: AWS_BUCKET_NAME,
      Key: fileKey,
    })
  );

// Returns a temporary signed CloudFront URL
const getImageUrl = (fileKey, validForHours = 24) => {
  if (!fileKey) return null;

  return getSignedUrl({
    url: `${CLOUDFRONT_DOMAIN}/${fileKey}`,
    keyPairId: AWS_CLOUDFRONT_KEY_PAIR_ID,
    privateKey,
    dateLessThan: new Date(Date.now() + validForHours * 60 * 60 * 1000),
  });
};

module.exports = { uploadToS3, deleteFile, getImageUrl, generateUniqueFileName };profile/12_1760000000000_ab12cd34.webp. Store the key in your database, never the signed URL. Signed URLs expire and are generated on demand.Define S3 folders
Folder constants keep keys consistent across your codebase:
const S3_FOLDERS = {
  PROFILE: "profile",
  POST: "post",
};

module.exports = S3_FOLDERS;Upload middleware with Multer
Multer parses multipart/form-data. Memory storage keeps the file in a buffer so we can process it before sending it to S3. This middleware accepts JPEG, PNG, WEBP and PDF files up to 5 MB.
const multer = require("multer");

const ALLOWED = ["image/jpeg", "image/png", "image/webp", "application/pdf"];

const fileFilter = (req, file, cb) => {
  if (ALLOWED.includes(file.mimetype)) return cb(null, true);
  cb(new Error("Only JPEG, PNG, WEBP images or PDF files are allowed"), false);
};

module.exports = multer({
  storage: multer.memoryStorage(),
  fileFilter,
  limits: { fileSize: 5 * 1024 * 1024 }, // 5 MB
});Optimize images with Sharp
Sharp converts every uploaded image to WebP at 80% quality, which usually cuts file size substantially. PDFs pass through unchanged. The middleware supports upload.single(), upload.array() and upload.fields().
const sharp = require("sharp");
const path = require("path");

const IMAGE_TYPES = ["image/jpeg", "image/png", "image/webp"];
const randomName = () => `${Date.now()}-${Math.round(Math.random() * 1e9)}`;

const collectFiles = (req) => {
  if (req.file) return [req.file]; // upload.single()
  if (Array.isArray(req.files)) return req.files; // upload.array()
  if (req.files && typeof req.files === "object") {
    return Object.values(req.files).flat(); // upload.fields()
  }
  return [];
};

const processImages = async (req, res, next) => {
  try {
    const files = collectFiles(req);
    if (!files.length) return next();

    req.processedImages = await Promise.all(
      files.map(async (file) => {
        if (IMAGE_TYPES.includes(file.mimetype)) {
          const buffer = await sharp(file.buffer)
            .rotate() // respect EXIF orientation
            .webp({ quality: 80 })
            .toBuffer();

          return {
            fieldname: file.fieldname,
            filename: `${randomName()}.webp`,
            file: buffer,
            mimetype: "image/webp",
          };
        }

        // PDFs and other allowed non-image files pass through untouched
        return {
          fieldname: file.fieldname,
          filename: `${randomName()}${path.extname(file.originalname)}`,
          file: file.buffer,
          mimetype: file.mimetype,
        };
      })
    );

    next();
  } catch (error) {
    next(error);
  }
};

module.exports = processImages;Routes and controller (user profile image)
As an example, assume your User model has a string column profileImage. The frontend sends multipart/form-data with the field image.
const express = require("express");
const router = express.Router();

const upload = require("../middleware/upload");
const processImages = require("../middleware/processImages");
const { uploadProfileImage, getUser } = require("../controllers/userController");

// Frontend sends multipart/form-data with the field name "image"
router.put("/profile-image", upload.single("image"), processImages, uploadProfileImage);
router.get("/:id", getUser);

// For multiple files use: upload.array("images", 10)

module.exports = router;const User = require("../models/User");
const S3_FOLDERS = require("../constants/s3BucketFolders");
const {
uploadToS3,
deleteFile,
generateUniqueFileName,
getImageUrl,
} = require("../utils/s3_bucket");
// PUT /users/profile-image
const uploadProfileImage = async (req, res) => {
try {
const userId = req.user.id;
const image = req.processedImages?.[0];
if (!image) {
return res.status(400).json({ message: "Profile image is required" });
}
const user = await User.findByPk(userId);
if (!user) return res.status(404).json({ message: "User not found" });
const oldKey = user.profileImage;
const fileName = generateUniqueFileName(userId, image.filename);
const key = await uploadToS3(
image.file,
S3_FOLDERS.PROFILE,
fileName,
image.mimetype
);
// Save the S3 key (not the URL) in the database
await user.update({ profileImage: key });
// Delete the old image only after the new one is safely stored
if (oldKey) await deleteFile(oldKey).catch(console.error);
return res.status(200).json({
message: "Profile image uploaded successfully",
data: { profileImage: getImageUrl(key) },
});
} catch (error) {
console.error("Upload profile image error:", error);
return res.status(500).json({ message: "Failed to upload profile image" });
}
};
// GET /users/:id
const getUser = async (req, res) => {
try {
const user = await User.findByPk(req.params.id);
if (!user) return res.status(404).json({ message: "User not found" });
return res.status(200).json({
data: {
...user.toJSON(),
profileImage: getImageUrl(user.profileImage),
},
});
} catch (error) {
console.error("Get user error:", error);
return res.status(500).json({ message: "Failed to get user" });
}
};
module.exports = { uploadProfileImage, getUser };Test it and verify CloudFront caching
Call the endpoint with a client such as Postman or curl:
curl -X PUT http://localhost:3000/users/profile-image \
  -H "Authorization: Bearer YOUR_TOKEN" \
  -F "image=@./photo.jpg"
Open the returned signed URL in your browser. Then open DevTools, go to the Network tab, select the image request, and check the response headers:
X-Cache: Miss from cloudfront   # first request, fetched from S3
X-Cache: Hit from cloudfront    # later requests, served from the edge
A Hit means CloudFront served the image from its edge cache. Requests for an unsigned URL should return 403.
Best practices and troubleshooting
Best practices
- Store S3 keys in the database and generate signed URLs when responding.
- Use short expiry times (hours or days) for sensitive images.
- Use unique, hashed file names so
immutablecaching is safe. - Rotate access keys and key pairs periodically.
- Prefer IAM roles over access keys when running on AWS.
Common errors
403 Forbiddenon every URL: the bucket policy for OAC is missing, or the wrong key ID is set.403only on signed URLs:AWS_CLOUDFRONT_KEY_PAIR_IDmust be the public key ID, not your IAM access key.AccessDeniedon upload: the IAM policy lackss3:PutObjectfor that bucket.- Image not updating: use a new file name for each upload rather than overwriting the same key.
- Signed URL always a cache Miss: query strings are part of the signature. Keep the CloudFront cache policy set to ignore the signing parameters.
Setup checklist
- Create a private S3 bucket.
- Create an IAM user with a least-privilege policy and an access key.
- Create a CloudFront distribution with OAC.
- Generate an RSA key pair and upload the public key.
- Create a key group and require it on the behavior.
- Add all values to
.env. - Add the S3 utility, Multer and Sharp middleware.
- Test the upload and check
X-Cache.
Related blog
How Uber and Rapido Find Nearby Drivers in Real Time